I would like to dedicate this blog to the Glory Hound inside myself and among us, showing off your creations ,getting positive feedback ,and above all just doing something you can be proud of is so important to all of us in some way. Please never be afraid to ask me how I do something, I don't believe in keeping trade secrets. Please comment, suggest, and enjoy .
Friday, October 26, 2012
Vacuum tube necklace
So,I have these great vintage vacuum tubes and I wanted to see if they could survive the baking process of having polymer clay added on to them. In anticipation of the carnage to come I placed the tubes on an oven safe plate and covered them with a ceramic bowl. There were no issues what so ever. I did let them cool down very slowly so there was no shock to the glass. I think this turned out pretty well for an experiment piece.
Thursday, October 25, 2012
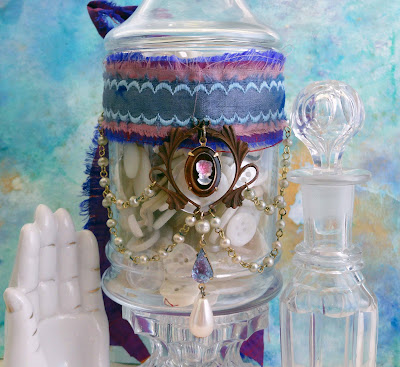
Victorian assemblage chocker
I found these amazing copper findings along with some lovely old glass pearl chains from Japan, on Larks Etsy store. When I opened my delivery and saw them I knew they had to be used together somehow. The metal finding is perfectly rusted and the links on the pearls have a great patina of greens and dark brown. I added my favorite German glass cameo and matching sugar glass drop and mounted it on a layered sari silks on the chocker. Simple but elegant and a great example of another use for the sari silk
Wednesday, October 24, 2012
Steampunk assemblage necklace and Tears
Today was an emotional roller coaster. I craft as a form of therapy for my depression, sometimes it is too much to even think about creating ,others I can't wait to get to work. Today I wanted to work but was in one of my crying moods. I have to laugh about it know because the whole time I was creating this piece I had tiers streaming down my face. I had to turn off the radio because each time a sad or slow song came on I would just start bawling again. I have nothing to be sad about, it's just how my emotional whirlwind of a life roles. In fact my husband has a love hate relationship with these days, he hates to see me cry, but he loves to make me laugh and see my giggle and cry at the same time. Any way, here is what I created today from some incredible vintage and new metal findings. I love the middle, it is a vintage pin from and artist sample, the copper is aged and rough but the rhinestones still shine and sparkle.
vintage jet glass bar pin
I have amassed a collection of vintage jewelry in different states of repair. It is way past time I started using them or begin to find them new homes with other who will. Today I am showing off a repurposed assemblage necklace featuring a vintage jet glass bar pin, religious medal with prayer on back and vintage rhinestone bits and pieces. It is mounted on a choker created with layers of up-cycled hand dyed sari silk ribbon. I like to try and maintain the usability of vintage jewelry by leaving pin backs and existing elements. In this case all the chains are looped through the stick bar and alternately through the silk. This way, if wanted, the pin can be removed and reused.
Tuesday, October 23, 2012
I'm Not Sari
I decided to start back with a quick example of how to create a ruffled wrist band from sari ribbon. I love love love silk sari ribbon and use it often in my creations. I have been asked multiple times were I purchase and how I create my signature chokers. Here is a little taste of how I go about it all.
You will need
Sari ribbon.
Scissors.
Glue stick
and a sewing machine or embroidery thread for hand details
sari ribbon purchased from lifestyleinspirations on Etsy
First you have to have a good flat stiff silk ribbon to work with. Sari ribbon comes wrinkled. I just soak the ribbons I have chosen in cool water for a second and begin to iron out the wrinkles.
Once that's done I can begin to decide how to stack up the colors. If a ribbon is too wide just snip the end and rip length wise, this gives a strait and frayed edge.
I use a glue stick, yes just a plain old school glue stick, to give me a temporary bonding agent between layers of silk. Glue sticks do not stain or discolor the fabric as long as they are used lightly. Just swipe the glue stack the fabric and run the iron over it for a second to dry the adhesive.
For a ruffle, sew a long stitch on your machine and pull the bobbin thread tight working down the length to form a ruffle. I like to then dip back in the water and iron down the ruffles. This gives me a flat surface to work with and a great texture to the fabric.
Finish off with decorative stitches. On this wrist band I selected an eyelet setting for two holes and sewed a corresponding long ribbon to the other side. Just thread through the holes for a custom fit. If you don't have a sewing machine just pull out your embroidery floss and practice your fancy stitches, the glue will keep everything in place and works as a light stiffener to aid you while working. Also consider adding beads and charms to the middle of your wrist band for added glamour.
Subscribe to:
Posts (Atom)


